Getting a new piece of body art is a significant financial and emotional investment, but the critical window of the first 7 to 14 days ultimately dictates how vibrant the ink will look for the rest of your life. During the dreaded, intensely itchy peeling phase, millions of enthusiasts make a devastating aftercare mistake. They operate under the outdated assumption that letting the skin completely dry out or smothering it in traditional, heavy occlusives is the safest route. In reality, this harsh environment triggers microscopic scabbing—tiny, almost invisible epidermal fissures that physically extract ink molecules right out of the dermis before they can permanently lock in, leaving behind a permanently faded, patchy, and visually compromised design.
Fortunately, modern dermatology and elite tattoo professionals have fundamentally shifted their approach, moving away from these archaic healing protocols. There is one highly specific recovery habit that directly contradicts the long-held myth that all thick ointments will inevitably suffocate a fresh wound. By utilizing a scientifically calibrated blend of barrier-restoring lipids, this targeted method rapidly reconstructs the compromised tissue. It achieves the perfect biological balance: trapping essential moisture to halt microscopic scabbing while remaining fully non-comedogenic so the skin can efficiently breathe and repair. This structural rebuilding process is the ultimate defense against color loss during the most vulnerable days of healing.
The Hidden Danger of Microscopic Scabbing
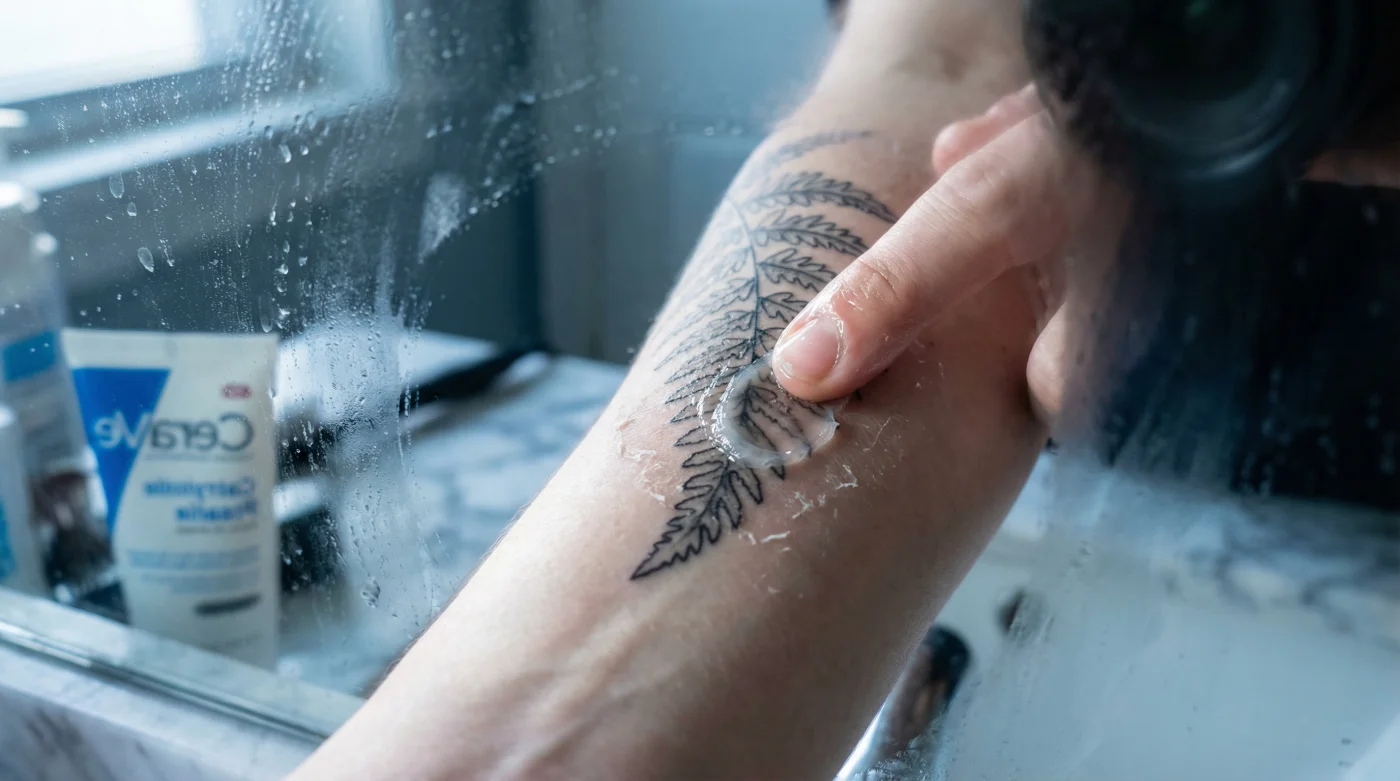
When a needle punctures your skin thousands of times per minute, it heavily traumatizes the stratum corneum, the outermost layer of your skin. If this layer is not correctly shielded, the body’s natural inflammatory response goes into overdrive. Studies confirm that using a scientifically advanced product like CeraVe Healing Ointment provides a vital, breathable seal. Unlike basic petroleum jelly, which simply sits on top of the tissue creating a sweat-trap, this specialized formula actively integrates with the cellular matrix to rebuild broken bonds.
Understanding why your tattoo isn’t healing optimally requires recognizing the early warning signs of barrier failure. Consider this diagnostic breakdown of common aftercare symptoms and their true physiological causes:
- Symptom: Intense, localized heat radiating from the tattoo. Cause: Acute inflammatory response due to excessive moisture loss, known clinically as transepidermal water loss.
- Symptom: Tight, glossy skin that feels prone to cracking upon movement. Cause: Severe dehydration of the epidermis, leading to an inflexible healing environment that promotes micro-tears.
- Symptom: Thick, crusty scabs forming over heavy ink saturation. Cause: Lymphatic fluid and plasma drying out on the surface, physically pulling pigment upward and out of the dermal pocket.
- Symptom: Cloudy, milky appearance over dark lines. Cause: Microscopic scabbing occurring just below the surface, creating an optical diffusion of the ink as dead cells pile up.
Recognizing these symptoms is only the first step; the real breakthrough comes from understanding the exact cellular mechanics needed to reverse this damage.
Why Ceramides Outperform Traditional Occlusives
- Whoop Fitness Straps fail reading biometrics through traditional Japanese sleeves
- Professional spray tans permanently stain white tattoo highlights a muddy yellow
- Daily sea salt soaks drastically accelerate fresh cartilage piercing migration
- Zinc Oxide Sunscreen permanently leaves white casts on blackwork tattoos
- Age fifty skin thinning permanently blurs delicate cursive collarbone script
| Aftercare Method | Target Audience | Primary Benefit | Drawback / Risk |
|---|---|---|---|
| Old-School Petroleum Jelly | Budget-conscious individuals, single-line tattoos | High occlusion, prevents immediate drying | Suffocates tissue, causes heavy scabbing if over-applied |
| Dry Healing (No Ointment) | Those with severe adhesive or topical allergies | Zero risk of pore clogging | Maximum color loss, agonizing itch, high cracking risk |
| CeraVe Healing Ointment | Color realism, heavy blackwork, sensitive skin types | Restores lipid barrier, prevents microscopic scabbing | Requires precise, micro-dose application to avoid maceration |
The Top 3 Biological Advantages of Ceramides
- Accelerated Cellular Turnover: Ceramides actively communicate with the keratinocytes, prompting faster regeneration of healthy skin cells over the traumatized tissue.
- Enhanced Breathability: The unique suspension of hyaluronic acid in the ointment prevents the dreaded suffocation effect, allowing oxygen exchange while aggressively blocking bacterial entry.
- Itch Suppression: By maintaining a highly hydrated dermis, the nerve endings responsible for the agonizing peeling phase itch are significantly calmed, reducing the urge to scratch.
Leveraging these biological advantages requires a precise, day-by-day application strategy to ensure your ink settles flawlessly.
The Clinical Protocol for Flawless Ink Retention
Applying CeraVe Healing Ointment haphazardly will not yield elite results. To prevent microscopic scabbing and ensure maximum color vibrancy, you must adhere to a strict, temperature-controlled dosing schedule. The goal is to apply a micro-layer that provides barrier protection without causing maceration—a condition where the skin becomes overly soggy and rejects the ink.
| Healing Timeline | Ointment Dosing Volume | Water Temperature | Physiological Goal |
|---|---|---|---|
| Days 1 – 3 (Acute Trauma) | 0.5 grams per 3 square inches | 98.6 degrees Fahrenheit | Seal the wound, prevent plasma hardening, block pathogens |
| Days 4 – 7 (Initial Peeling) | 0.25 grams per 3 square inches | 90.0 degrees Fahrenheit | Soothe itching, lubricate flaking skin, prevent micro-tears |
| Days 8 – 14 (Secondary Healing) | Switch to standard lotion if peeling is complete | Room Temperature | Maintain deep tissue hydration, normalize cellular turnover |
Always begin by gently washing the area with a fragrance-free, antibacterial cleanser using lukewarm water at exactly 98.6 degrees Fahrenheit to match your body temperature, preventing thermal shock to the traumatized tissue. After patting completely dry with a sterile paper towel, apply a strictly measured amount of the ointment. You are aiming for a layer no thicker than a fraction of a millimeter—just enough to give the tattoo a slight sheen, but not enough to leave a sticky, highly reflective residue.
Mastering this precise dosing schedule seamlessly transitions you into the final and most critical stage of the tattoo recovery journey.
Navigating the Peeling Phase and Quality Control
Days 4 through 10 are notorious for the intense peeling and flaking that sends many running for relief. This is the exact moment when microscopic scabbing threatens to ruin your body art. Because the stratum lucidum and surrounding tissues are rapidly shedding dead cells, any aggressive scratching or picking will physically yank the underlying pigment out of its intended pocket. The consistent application of CeraVe Healing Ointment acts as a flexible, protective matrix. It keeps the shedding skin soft and pliable, allowing it to fall off naturally during washing rather than catching on clothing and tearing prematurely.
| Recovery Phase | Expected Symptoms | Quality Action (What to Look For) | Danger Protocol (What to Avoid) |
|---|---|---|---|
| The Weeping Phase (Days 1-2) | Oozing plasma, slight swelling, tenderness | Clear plasma, reduction in redness within 48 hours | Yellow/green pus, extreme heat (signs of infection) |
| The Peeling Phase (Days 3-7) | Skin flaking like a sunburn, intense itching | Flakes falling off naturally during gentle washing | Manually peeling flakes, heavy scratching, picking |
| The Silver Skin Phase (Days 8-14) | Tattoo looks slightly cloudy or shiny | Smooth texture, consistent color underneath | Over-moisturizing, returning to heavy occlusives |
Critical Aftercare Mistakes to Avoid
- Over-saturation: Applying more than the recommended pea-sized drop per section can cause the pores to clog, leading to trapped heat and bubbling of the fresh ink.
- Direct Sun Exposure: UV rays physically break down the chemical structure of tattoo pigments and degrade the protective ceramides in the ointment. Always cover the healing area with loose, breathable cotton clothing.
- Abrasive Towels: Never use standard terrycloth bath towels on a healing tattoo; the looped fibers harbor bacteria and act like sandpaper against the delicate, rebuilding epidermis.
By rigorously following this medically backed progression plan and avoiding common pitfalls, you guarantee your body art remains as vivid and sharp as the day you left the studio.