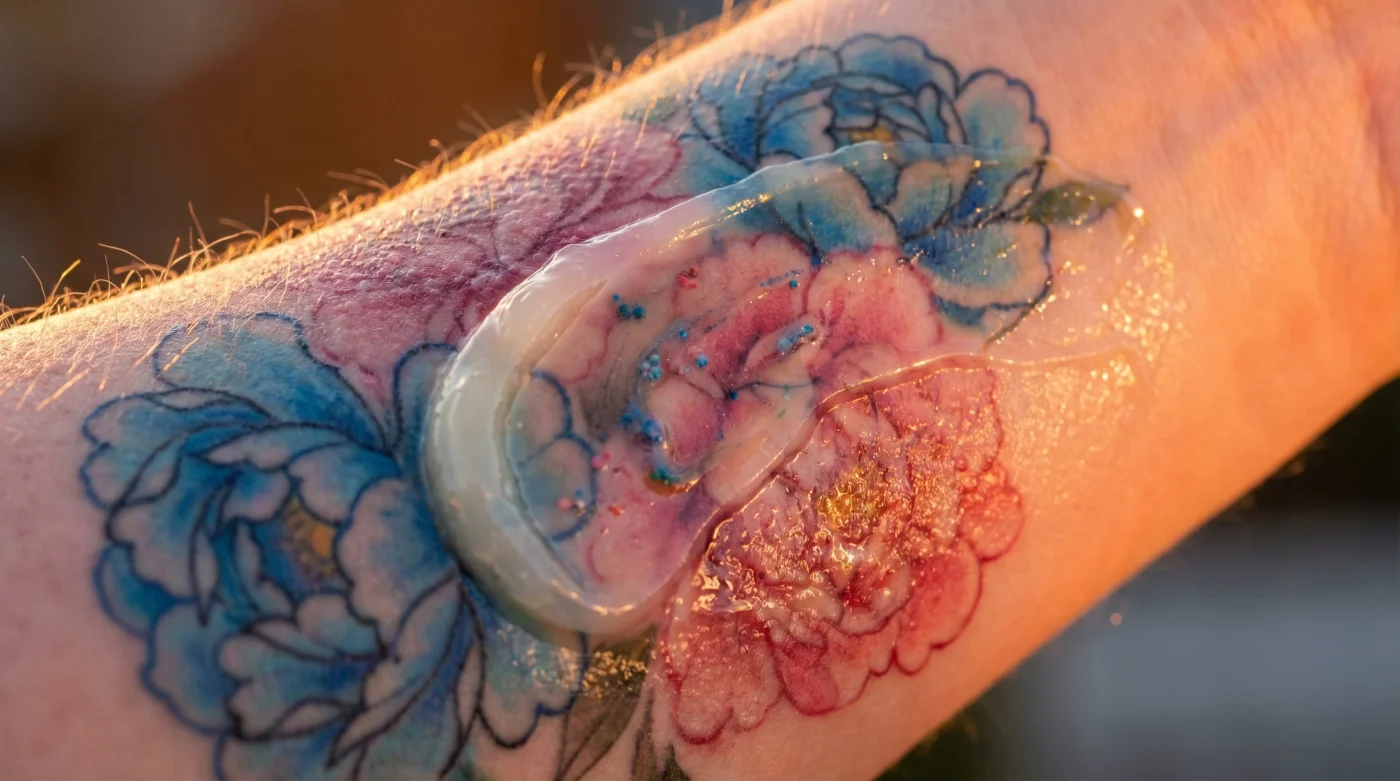
You just spent hundreds of dollars and several painful hours acquiring a vibrant, delicate watercolor tattoo, and naturally, you want to protect it. For generations, the standard American advice for any minor skin trauma has been to reach into the medicine cabinet for a trusty tube of triple antibiotic ointment. However, dermatology experts and elite tattoo artists are now warning of a catastrophic failure in this outdated protocol. Applying this thick, medicated barrier to a fresh, delicate piece does not accelerate healing; instead, it triggers a destructive biological reaction that essentially ruins the art before it even sets.
This hidden habit is responsible for thousands of patchy, faded, and blurred tattoos every year. The culprit lies in the very formulation designed to save your skin. When occlusive, petroleum-based zinc formulations are layered over open dermal wounds, they create a suffocating greenhouse effect. This restricts vital oxygen and aggressively pulls carefully deposited pigment back to the surface during the skin’s most vulnerable healing phase. To save your expensive artwork, you must understand exactly why this chemical reaction occurs and how to properly nourish the damaged tissue without draining its color.
The Biological Clash: Why Antibiotic Ointments Destroy Delicate Ink
Watercolor tattoos are particularly vulnerable because they rely on subtle gradients, diluted pigments, and a lack of harsh black outlines to hold the design together. When you apply Neosporin or similar antibiotic salves, you are introducing a heavy, petrolatum-based vehicle packed with active ingredients like bacitracin zinc, neomycin, and polymyxin B. Studies demonstrate that while these ingredients effectively kill bacteria, they also trigger a hyper-aggressive immune response. The body identifies the foreign ink particles as pathogens. The occlusive barrier traps heat and moisture, causing the skin to over-hydrate and swell, which forces the suspended pigment out of the dermis and into the healing scab.
Tattoo Style Comparison: Healing Vulnerabilities and Benefits
| Tattoo Style | Typical Pigment Density | Neosporin Risk Level | Primary Benefit of Proper Airflow |
|---|---|---|---|
| Watercolor | Low/Diluted | Critical (Complete color fade) | Preserves soft gradients and pastel tones |
| Fine Line | Medium | High (Line blowout and spreading) | Maintains crisp, microscopic boundaries |
| Traditional American | High/Dense | Moderate (Patchy healing) | Keeps solid black lines and heavy shading intact |
Recognizing how your specific tattoo style reacts to these suffocating barriers is the very first step in diagnosing a failing healing process.
Diagnosing the Damage: Symptoms of Pigment Rejection
- Whoop Fitness Straps fail reading biometrics through traditional Japanese sleeves
- Professional spray tans permanently stain white tattoo highlights a muddy yellow
- Daily sea salt soaks drastically accelerate fresh cartilage piercing migration
- Zinc Oxide Sunscreen permanently leaves white casts on blackwork tattoos
- Age fifty skin thinning permanently blurs delicate cursive collarbone script
Symptom-Cause Troubleshooting List
- Symptom: Excessive Weeping of Colored Fluid = Cause: The heavy petroleum barrier is suffocating the pores, causing the body to flush out the ink to clear the trapped heat and plasma.
- Symptom: Thick, Heavy, Bubbling Scabs = Cause: Over-hydration of the tissue from trapped moisture, preventing the natural, paper-thin flaking required for healthy tattoo recovery.
- Symptom: Red, Itchy, Inflamed Halo = Cause: Potential localized allergic contact dermatitis caused by neomycin, an ingredient notorious for triggering severe topical reactions.
- Symptom: Blurring of Fine Edges (Blowout) = Cause: The active drawing power of zinc combined with tissue swelling forces the ink to migrate laterally beneath the skin.
Scientific Data: The 14-Day Cellular Recovery Timeline
| Healing Phase | Biological Mechanism | Optimal Treatment Dosing | Effect of Petroleum Barrier |
|---|---|---|---|
| Days 1-3 (Inflammation) | Macrophage cells encapsulate ink. Blood plasma seals the wound. | Wash gently every 8 hours. Apply 0.5 grams of breathable lotion. | Traps plasma; causes severe ink weeping and heat retention. |
| Days 4-7 (Proliferation) | Fibroblasts rebuild tissue. Epidermis begins to peel. | Apply 1-millimeter thin layer of aftercare 2 times daily. | Turns natural, thin flakes into thick, ink-stealing scabs. |
| Days 8-14 (Maturation) | Skin barrier seals. Pigment permanently settles into the dermis. | Maintain hydration. Keep shower water temp below 98 Fahrenheit. | Prolongs cellular inflammation and dulls final color vibrancy. |
Once you understand the chemical and biological warfare occurring beneath the surface, you can seamlessly implement a precision-guided recovery protocol.
Executing the Flawless Recovery Protocol
Experts advise that less is truly more when it comes to fresh ink, especially for fragile watercolor pieces. Your goal is to provide just enough moisture to prevent cracking, while allowing maximum oxygen exchange to facilitate cellular repair. You must completely abandon the medicine cabinet antibiotic pastes and transition to specialized, breathable aftercare. The golden rule is to keep the application incredibly thin. If your tattoo looks glossy or wet after moisturizing, you have applied too much and are risking the very suffocation we need to avoid.
For actionable dosing, begin your routine by washing the area with a fragrance-free, antibacterial pump soap. Use lukewarm water strictly regulated between 95 and 98 degrees Fahrenheit; hot water will open the pores too widely and strip natural oils. Gently pat the area completely dry with a sterile paper towel—never a cloth towel, which harbors bacteria. Wait exactly 10 minutes to allow the skin to air out completely. Then, apply a microscopic 1-millimeter thin layer of a high-quality, water-based tattoo lotion or pure, unrefined shea butter. You should use no more than a pea-sized drop (approximately 0.5 grams) for a tattoo the size of your palm. Massage it gently until it is entirely absorbed into the skin.
Aftercare Quality Guide: What to Look For vs. What to Avoid
| Ingredient Profile | What to Look For (The Good) | What to Avoid (The Bad) |
|---|---|---|
| Base Carrier | Water-based lotions, natural shea or cocoa butter | Petrolatum, mineral oil, heavy lanolin |
| Active Additives | Panthenol (Vitamin B5), Hyaluronic acid for cellular hydration | Triple antibiotics (Neomycin, Bacitracin), harsh astringents |
| Fragrance & Preservatives | 100% Fragrance-free, naturally preserved | Artificial perfumes, synthetic dyes, heavy parabens |
| Texture & Absorption | Matte finish, absorbs completely within 2 minutes | Glossy, sticky, sits on top of the skin as a heavy film |
Committing to this strict, breathable regimen guarantees rapid healing, leading us to the final rules of long-term artwork preservation.
The Long-Term Preservation of Watercolor Art
Ultimately, treating a new tattoo requires viewing it as an open medical procedure rather than a simple scrape. By removing Neosporin and other aggressive, suffocating ointments from your aftercare arsenal, you protect the delicate dermis from chemical-induced ink extraction. Watercolor tattoos demand the highest level of respect during the critical 14-day healing window. By embracing oxygen-rich, lightly moisturized recovery methods, you ensure that those beautiful, fluid splashes of color remain brilliant, sharp, and permanently embedded for decades to come.
Mastering this immediate aftercare timeline successfully transitions your delicate watercolor piece from a vulnerable wound into a permanent, vibrant masterpiece.